Friday, April 29, 2011
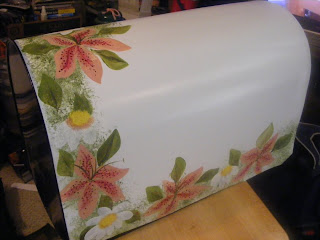
Painted Mailbox Cover
I envy those that still have the rural mailboxes, as it seems housing complexes are all getting those PO Box style mailboxes .. I just think it takes the uniqueness out of things.
Soooo ... I'm always thrilled when I get a mailbox or mail box cover order. My latest customer requested a floral mailbox cover for his T3 mailbox. I used my 1 inch and 3/4 inch brushes, painting with acrylics. After drying, I sprayed with 5-6 layers of lacquer.
Sunday, April 24, 2011
Work In Progress For Her_Continued
Ever have a brain freeze on one project, so you work on another? I'm having a lot of trouble finding inspiration for one of my latest design team assignments ... so I am working a little more on my box.
I don't know what this will look like when I'm done, but I have an idea of what I want it to look like - and I'm trying not to rush through it.
I play around with this on my paint table, and then I brush sketch onto the box:
I started adding figures:
And last night, I left off with this tree:
I don't know what this will look like when I'm done, but I have an idea of what I want it to look like - and I'm trying not to rush through it.
I play around with this on my paint table, and then I brush sketch onto the box:
I started adding figures:
And last night, I left off with this tree:
Friday, April 15, 2011
New Work In Progress_Painted Box For Her
Hello Bloggers!
I posted my last work in progress box, that I was painting for my son on my Brown Sugar baby Brushes blog earlier today. So, since turnabout is fair play, I thought I do the other box I'd started for HER.
I posted the beginnings a couple of weeks ago, and this week I added a little texture for the grass using a sea sponge ... and then, going around the corners of the box, I added red circles using a stipple brush - for the roses.
Then, using my tiny angle brush, I loaded my brush and started adding the back petals.
By the time I've added all the back petals, making my way around the entire box, the first bunch are dry. I then re-load and begin filling in the front petals. I work my way all around again, until all the roses are done. Then, using the same small angle brush, I load in a dark green and sporadically add leaves around the roses.
I have no clue what I'm adding to this box, I'm making it up as I go along ... so as I add more, I'll post my progress.
I hope everyone has a good weekend.
I posted my last work in progress box, that I was painting for my son on my Brown Sugar baby Brushes blog earlier today. So, since turnabout is fair play, I thought I do the other box I'd started for HER.
I posted the beginnings a couple of weeks ago, and this week I added a little texture for the grass using a sea sponge ... and then, going around the corners of the box, I added red circles using a stipple brush - for the roses.
Then, using my tiny angle brush, I loaded my brush and started adding the back petals.
By the time I've added all the back petals, making my way around the entire box, the first bunch are dry. I then re-load and begin filling in the front petals. I work my way all around again, until all the roses are done. Then, using the same small angle brush, I load in a dark green and sporadically add leaves around the roses.
I have no clue what I'm adding to this box, I'm making it up as I go along ... so as I add more, I'll post my progress.
I hope everyone has a good weekend.
Saturday, April 9, 2011
Quick And Easy Project For You To Try
This month on the Scraps of Color E:spire blog, I created a quick and easy tutorial showing you how you can take one element from an item and paint a matching card. I'd love to see some of you guys try it - and post a link in the comments to your finished design.
Saturday, April 2, 2011
My Favorite Era Layout - Harlem Renaissance
On Your Paper Pantry, the 2011 Travelogue Swap is well underway. The latest travelogue I received from Tamara was fantastic - the theme - Your Favorite Era. Only one problem ... I cringe when I have to go back into the past for a favorite era, for a couple of reasons ... but creatively, none of the paper companies seem to want to celebrate the fabulous vintage era of African Americans. I want to scream - WE SCRAP TOO YA KNOW!!! LOL
As much as I love Graphic 45 - it irks me that the selection is next to nil ... but you know what? ... there's this thing called GOOGLE!!LOL
I googled fabulous images and printed them out on vellum paper ... then dug into my stash for mainly black and white paper, charms and other pretties ... and I came up with my Harlem Renaissance lay out.
I found some wonderful charms from a company called Creative Charms ... and it was perfect. I also used some of the stick pins that I'd made last weekend.
The lesson? Don't let commercial unavailability stop you from creating. If you can't find it - make it!
~Happy Crafting!
Friday, April 1, 2011
New SOC Mag Is Out ... and I Have A Project For You!!!
Happy April!!!
The newest edition of the Scraps of Color Espire is now out - and I have a wonderful painted rose journal I'd love you guys to try!
Click HERE and click on the pic for your free download....and check out my project on page 50.
I'd love to see what everyone finds to do in this issue!
The newest edition of the Scraps of Color Espire is now out - and I have a wonderful painted rose journal I'd love you guys to try!
Click HERE and click on the pic for your free download....and check out my project on page 50.
I'd love to see what everyone finds to do in this issue!
Subscribe to:
Posts (Atom)